As has been the pattern in recent years, now that I've got to the summer months I have time to recover my health, and to work on some models. While the glue sets on the Se5a here is the first of several entries on this 1/10 figure from Young Miniatures. Moulding is nice and crisp and the subject matter is imaginatively handled, with lots of different surfaces and elements to challenge the modeller, as well as a really characterful face and nice details such as tears in the clothes and dents in the breast plate which are sculpted into the figure. There is even a set of playing cards in his hat which are held in place by a bejewelled brooch, which must be pretty unique features - these are moulded as a single separate piece which can be added at the end over the top of the separate feather. I will add that building this particular figure wasn't my idea - he was bought by my wife on the basis that I would complete this figure for her office. Why this particular figure? Well she's from Swabia in southern Germany, the natural home of the Landsknecht, and is a 16th century art historian, so she has an interest in the subject matter. It represents a welcome change from my usual focus and provides some interesting opportunities to attempt some challenging colours.


As usual I spent time washing the various pieces in warm and soapy water in order to remove any remaining residue from the casting process. I then removed the various casting blocks, some of which were quite substantial. The arms are separate pieces and once these were added I needed to fill some gaps, as you can see below with the joint for the left arm. I fed thin CA glue into the spaces and once this had dried I went over the remaining issues with Mr Dissolved Putty. I also needed to add some surfacer in a small number of places, notably on the right elbow.

I suspect this is one of the earlier figures in the range because it comes without a stand. This seems odd, especially as there is no space moulded under the figure to fit a stand, despite the fact that the figure is so large that a stand is obviously required. So, I created a stand with some plastic tubing and sheet, which was cut at the top at a diagonal angle, and then I shaped the area under the figure, starting with drilling out holes which were then enlarged with a hobby knife. This sounds a lot more drastic than the reality - I didn't remove much resin at all. Eventually I was able to add the stand and this made the figure a lot easier to handle. As you can see in the various images, the figure is quite broad, partly because of the nature of his costume, and this means that the stand needs to be pretty robust in order to balance the figure.

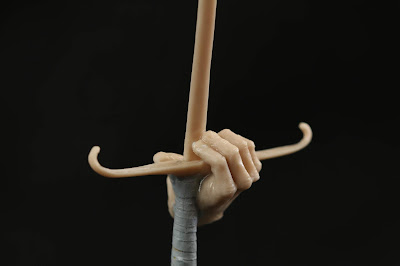
The biggest complication is the double handed sword (Zweihänder or Doppelhänder) to which is attached the right hand - his Katzbalger or short sword would have have hung from his belt and so is not visible on this figure. The sword blade is a separate piece, and in the absence of anything to key this into the sword hilt, there is a risk that simply trying to glue the blade and hilt together will result in a rather fragile join. I also wanted to change the rather plain grip, so I wound masking tape around this (but not the pommel) and went over it with Mr Surfacer 1500, which both set it in place and created a more leather-like appearance.

I then glued a small piece of metal rod into the sword guard and drilled out a corresponding hole in the blade, so these were then joined up using CA glue. Even then the join was quite delicate so I drilled out a horizontal hole through the blade and into the hand, to which I added a small piece of plastic tubing. This was used instead of metal because I wanted to be able to cut it back flush to the hand.

The whole area was then flooded with thin CA glue and allowed to set over a period of several days. The result was quite a firm join and a much more stable piece.
At this point I did a fair amount of test fitting, and found that the feather in his hat, which is another separate piece, needs to be fitted last because there is a risk of fitting it before the sword and so making it impossible to fit the sword. I had done some preliminary test fitting as I went along, but with the main parts of the figure constructed, and the sword in particular now a stable piece, some more meaningful test fitting could take place and clearly it was time well spent.
Happy modelling,
Nick


0 Yorumlar